Talos Linux Homelab Pt. 3: Storage Solutions
Can’t do much if you can’t remember anything
The last thing I’ll cover in this series for the time being is storage. This is perhaps the most crucial part of a complete homelab setup, as without storage you are very limited in what you can do that is useful. Essentially I wanted expandable, reliable, and moderately fast storage that could be accessed by all the nodes in my Talos cluster. Turns out I had to give up a bit of high availability to get there, but that’s okay.
The final setup resulted in the following storage classes:
longhorn: highly available block storage spread across cluster nodes, able to schedule replicas on the same node as workloads.truenas-iscsi-nvme: block storage served from a TrueNAS server over iSCSI, housed on a spare 2 TB NVMe drive.truenas-iscsi-hdd: same as above, but housed on a RAIDz1 array of 4x 8 TB hard drives that cost me more than I wish they had.truenas-nfs-hdd: NFS volumes served from the same RAIDz1 array of 4x 8 TB hard drives, for data that needs to be shared between multiple services or accessible from my desktop.
I also ended up building a new desktop on which to install TrueNAS. Expensive stuff.
The low-hanging fruit: Longhorn
Longhorn is a CNCF project that provides highly
available node-backed block storage for Kubernetes clusters. It lets you make
use of local disks on your cluster nodes to provide persistent storage for your
workloads. It’s easy to set up, but since Talos is an immutable OS, you have to
create an rw bind mount for it to use:
# talos/patches/longhorn-mount.yaml
machine:
  kubelet:
    extraMounts:
      - destination: /var/lib/longhorn
        type: bind
        source: /var/lib/longhorn
        options: [ bind, rshared, rw ]
A standard installation of Longhorn creates a storage class that defaults to 3 replicas for each volume you create. Each of these replicas is stored on a different cluster node, and if one node goes down, your data is still safe and available for when your containers get scheduled elsewhere.
When upgrading Longhorn to a new version, make sure to follow upgrade instructions from its documentation. It is not as simple as updating to the newest version of the official Helm chart. Not doing so may result in data loss.
Building a TrueNAS server
For the rest of my storage needs, I needed a dedicated storage server. I’d never had a proper NAS before, only a 4 TB external hard drive plugged into an old laptop serving simultaneously as an HTPC and home server years ago. So this was going to be new territory for me.
To get started, I built a new desktop PC to run TrueNAS on. It needed to be relatively affordable, quiet, stable, and have a case designed to fit multiple hard drives. The case I settled on was the Fractal Design Node 804, and for the sake of upgradability, I went with an AM5 motherboard and CPU. If you’re curious, this is the full parts list on PCPartPicker.
What do I call it? All my homelab nodes are named after provincial capitals in Canada, but since this lies outside the cluster itself, I decided to name it Windsor, after the city that borders Detroit. It’s a major trade hub with the United States.
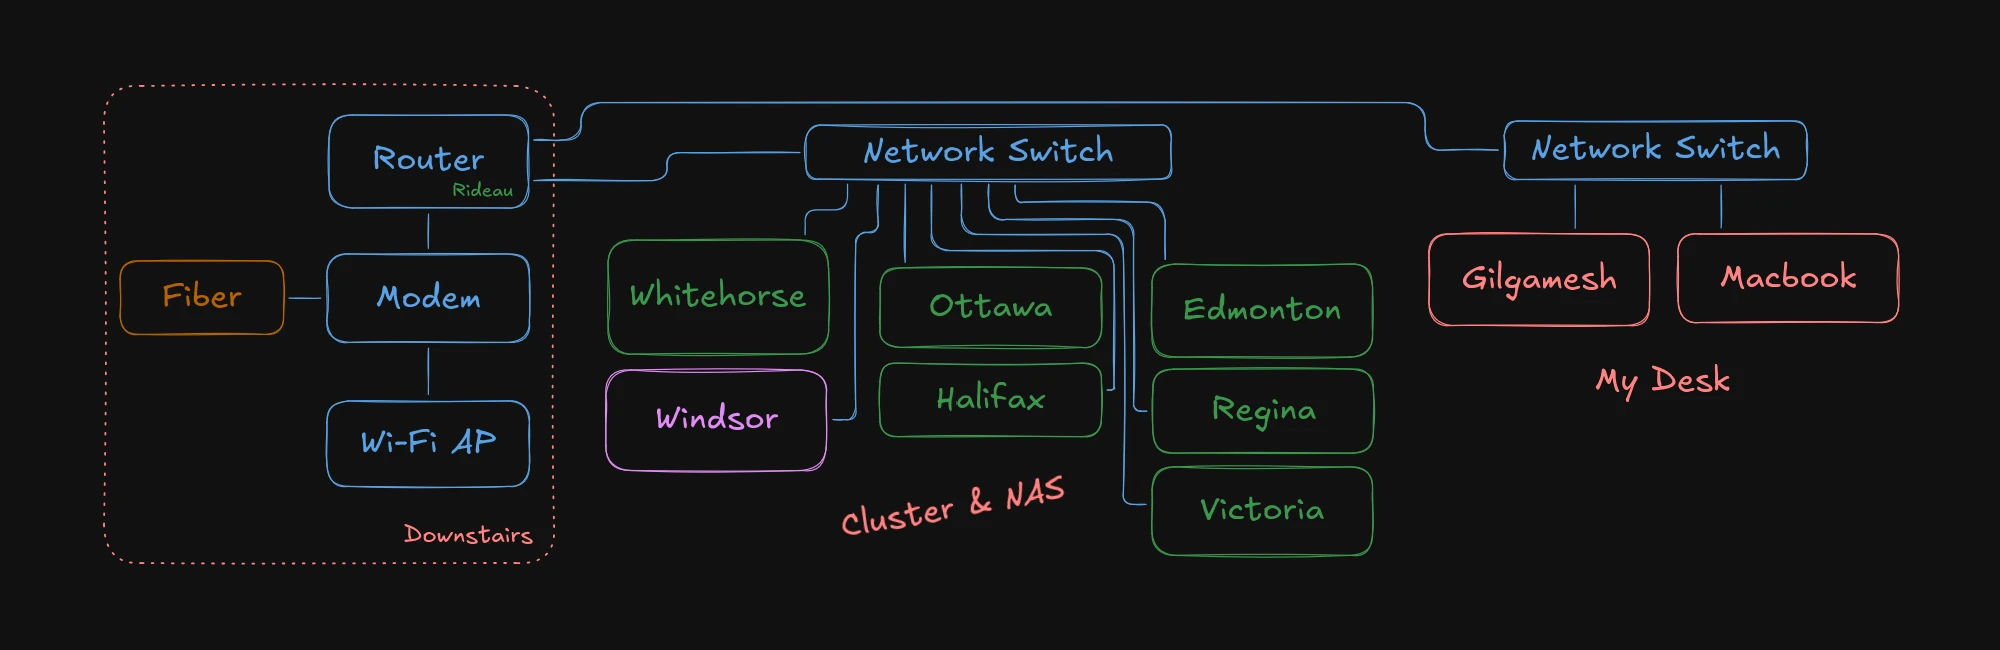
Diagram of the infrastructure here at home.
Installing TrueNAS is a relatively straightforward endeavor. My chronic bad luck, however, struck again, twice:
- Ventoy couldn’t boot TrueNAS SCALE’s ISO image. #3069
- ACME registration was broken on TrueNAS due to a removed field. #16646
It just couldn’t be easy, huh?
RAIDz1 HDD array
Hard drives are expensive, and sacrificing the price of one for the sake of redundancy was a bitter pill to swallow. The readers of this website — assuming they exist — are probably aware of what RAID arrays are, and what RAIDz1 means. That’s all this section covers, really, so I’ll be brief.
RAIDz1 is ZFS’ implementation of RAID 5. It stripes data across multiple drives, with parity information distributed among them. This means if one drive fails, no data is lost. Unless, that is, you don’t rebuild the array before a second drive fails. Note that the more drives are in the array, the higher the odds of failure.
Probability of failure
Let \(p \in (0,1)\) be the probability of a single drive failing during a given time period. The probability of at least one drive failing in an array of \(n \in \mathbbm{N}\setminus \{0,1\}\) drives derives from \(n\) as follows:
- The variable \(F\) models the failure of a single drive as a Bernoulli random variable with parameter \(p\): \(F \sim Bern(p)\).
- Though the probability of each drive failing is different, assume \(p\) to be the worst case scenario across all drives.
- Assume drive failures are independent events.
- The variable \(C\) models \(n\) independent events of \(F\), meaning \(C \sim Bin(n, p)\).
From 4, the following is the probability of no drives failing in a given period:
$$ \mathbbm{P}(C = 0) = \mathbbm{P}(F = 0)^n = (1 - p)^n $$Finally, the variable \(A\) models the event of at least one drive failing (\(C \geq 1\)) after \(t\) hours of operation. It has a geometric distribution:
$$ \begin{aligned} \mathbbm{P}(A = t) &= (\mathbbm{P}(C = 0))^{t-1} \cdot \mathbbm{P}(C \geq 1) \\ &= (1 - p)^{n(t-1)} \cdot \left(1 - (1 - p)^n\right) \\ &= (1 - p)^{n(t-1)} - (1 - p)^{nt} \end{aligned} $$Because \(A \sim Geom(q)\) with \(q = 1 - (1 - p)^n\), we know as time progresses, the probability of at least one drive failing approaches 1. However, what we want to demonstrate is that as \(n\) increases, so does \(q\), meaning the probability of at least one drive failing in a given time period increases with the number of drives in the array. This is intuitive:
$$ 1 - p \in (0,1) \implies (1 - p)^n > (1 - p)^{n+1} \implies 1 - (1 - p)^n < 1 - (1 - p)^{n+1} $$Thus, the formalism shows more drives leads to higher risk of failure. That concludes this entirely unnecessary aside.
Datasets within it
My 4 HDDs are in such an array, giving me a total of 24 TB of usable space.
This RAIDz1 array comprises the wolves dataset in TrueNAS. Inside of it, I
created a k8s dataset to hold all my cluster’s volumes. Within it, two
datasets:
iscsi, for iSCSI volumes, which won’t be shared between multiple replicas.nfs, for NFS shares, which can be mounted by multiple replicas and by my desktop.
In each of these, there are also two datasets:
volumes, which holds the volumes themselves, andsnapshots, which holds periodic snapshots of the volumes for backup purposes.
This is particularly useful for the democratic-csi setup.
The spare NVMe SSD
I had an extra 2 TB NVMe SSD lying around and decided to put it to use for storage that doesn’t need redundancy. I could claim it benefits from speed, but the 1 Gbps network limit makes that a moot point. The only arguments in favor of using this drive are potentially lower latency and not taking up space in my RAIDz1 array for things I can afford to lose.
This is the only block storage device in the nvme dataset, in which the k8s
dataset structure was reproduced.
Storage rules of thumb
In the end, the following rules dictate how I choose a storage class for any given workload’s persistent storage needs:
- Does it need to be fast? Then use
longhorn, as it can achieve data locality on the node where the workload is scheduled. - Can we afford to lose data in the event of disaster? If so, use any of the
-nvmeclasses, but otherwise use-hdd. - Does it need to be shared between multiple replicas or services? Then use NFS, but otherwise use iSCSI.
Number 1 is the most important rule, as databases and similar workloads benefit greatly from low latency and high throughput. The RAID array has been used for media libraries and backups, while the NVMe drive has been used only for testing purposes so far.