Finding out I dislike the AWS CI/CD stack of tools
Frustrated attempts at using AWS CodeCommit, CodeBuild, and CodePipeline
This article was originally written as a walkthrough of my adventures using the suite of CI/CD services offered by AWS. However, as I hit obstacles during implementation, it slowly turned into a rant about how immature they are. A lot of what was written up until I decided to give up on the proof of concept was kept as-is. The rest has been adapted into what you are about to read.
I recently tried my hand at the set of practice questions for the AWS Certified DevOps Engineer Professional certification exam. It proved challenging, likely due to my hands-on experience with AWS up until a few months ago being limited to maintaining EC2 instances and EKS/ECS clusters, and the exam questions dabbled quite a bit on the CI/CD side of AWS. In the end only 50% of my answers were correct.
As a way to study and compensate for that lack of experience, I decided to try out AWS CodeCommit, CodeBuild and CodePipeline for myself by seeing what it would be like to use them for some of my personal projects. My original plan was to pick a few personal projects with different requirements, reproduce them using the aforementioned services, and then write about my experience and make a shallow comparison between using exclusively AWS and exclusively GitHub or GitLab and their integrated services. The conclusion I reached: stick to the others if you can.
The cost of following my footsteps
As of the time of writing, all of these services offer a free tier that should be enough for you to try them out at least once. However, this is not intended as a guide and so if you follow every step outline here to the letter, you’ll just end up wasting your time and growing frustrated, as I will also cover my mistakes. If you’re eligible for the free tier and really do wish to try these services out, all I can say is that I had no cost associated with this experiment.
Some of my frustration can be attributed to stubbornly sticking to Terraform without relying on third party modules. If it doesn’t bother you to use the console, I recommend you do so unless you’re already familiar with both AWS and Terraform.
Initial considerations and warning signs
AWS is an entire platform with a ton of services, not a Git suite. Implementing a Git suite from scratch is no easy feat, but AWS made their jobs much harder as they decided to integrate their offerings with existing AWS services. All things considered, they did an impressive job, but your experience won’t be as seamless as it would be on GitHub or GitLab.
Here are a few bullet points that may count as pros, cons, or neither, depending on your perspective:
- AWS CodeCommit users are IAM users. Unlike GitHub and GitLab, all accounts belong to the same account: your AWS account. Permissions are managed through IAM policies, and SSH keys are added through the IAM console.
- AWS CodeCommit SSH keys cannot be ED25519, despite EC2 instances supporting the ED25519 elliptic curve. Public SSH keys need to be RSA or PEM formatted for use with the service, ruling out ED25519 keys.
- The SSH username is not
'git', but a randomly generated SSH Key ID, given to you after you add the key to your IAM user. The alternative would be to restrict keys to a single account and IAM user, as the key would serve as an identity. - Repositories are created in specific regions, rather than existing globally. This is evidenced in the URL used for cloning your repository, and might be done for the sake of legal compliance.
- CodeBuild and CodePipeline count as CodeCommit users, since they assume an AWS identity when accessing repositories and consequently fit the definition for active users. Did I mention you have to manage these permissions?
- You can’t just commit a file and have builds run automatically, you’ll have to use EventBridge for capturing pull request events and, depending on what you want to do, Lambda functions are the only way.
- Pipelines on CodePipeline have a fixed branch on which they run, meaning you might be looking at creating multiple nigh identical pipelines depending on your workflow. Not even Jenkins is this inflexible.
None of this was known to me when I started walking down this road. These are only the first warning signs that you’re not going to have a good time. At least not if you’ve used GitHub Actions, GitLab CI/CD, or Jenkins before. These tools have flaws of their own, and some of them are not small flaws, but for most use cases, I’d still pick any of them over the AWS services.
Setting up a user for AWS CodeCommit
As mentioned above, CodeCommit users are IAM users, so the first thing to do is create a user that has access to the service, or grant that access to an existing one, which is what I did. Here’s a word of warning before you go around creating a bunch of users for a hypothetical scenario: the free tier for CodeCommit allows for up to 5 active users, defined as follows:
An active user is any unique AWS identity (IAM user/role, federated user, or root account) that accesses AWS CodeCommit repositories during the month, either through Git requests or by using the AWS Management Console. A server accessing CodeCommit using a unique AWS identity counts as an active user.
So stick to 5 active users according to that definition and you should be fine. To avoid dealing with inline policies, I created a group called CodeTools, and then added AWSCodeCommitPowerUser, which disallows deleting repositories, but gives otherwise full access to AWS CodeCommit. More predefined policies can be added to the group as needed.
The next step is to head over to the IAM console and add an SSH public key for AWS CodeCommit to the IAM user we’ll be using moving forward. Note that the key must be RSA or PEM formatted, which wasn’t my case initially, so I just generated a new RSA key:
$ ssh-keygen -t rsa # the generated pubkey is in ~/.ssh/id_rsa.pub
Normally, when authenticating over SSH to any Git suite, you’d use git as
your username and the key serves as your identity. However, for CodeCommit
you’ll need to use the SSH Key ID of the key added to the IAM user. It is
generated when you add it through the console. Refer to this part of the
documentation.
Building my XMonad configuration on AWS
The repository I’m trying to host on AWS is d3adb5/dotfiles, currently hosted on GitHub and with a continuous integration pipeline set up through GitHub Actions. The requirements for this experiment to be deemed a success are:
- The repository will be hosted on AWS CodeCommit.
- Anytime a pull request is opened or updated, AWS will run the CI pipeline.
- The CI pipeline should be able to restore cached dependencies across builds.
The following Terraform code was used to provision the repository:
resource "aws_codecommit_repository" "dotfiles" {
  repository_name = "dotfiles"
  description     = "Configuration files for the set of programs I use daily."
}

output "clone_url_ssh" {
  description = "URL used to clone the repository using SSH."
  value       = aws_codecommit_repository.dotfiles.clone_url_ssh
}
I’m using the us-west-2 region, so the clone URLs will use the domain name
git-codecommit.us-west-2.amazonaws.com.
Pushing commits to AWS CodeCommit
I enjoy using short, convenient names for SSH hosts instead of entire URLs, so
I added this to my ~/.ssh/config:
Host aws
  Hostname git-codecommit.us-west-2.amazonaws.com
  User MYSSHKEYIDWENTHERE
Then I set up the remote and pushed from the master branch:
git remote add aws aws:/v1/repos/dotfiles
git push aws master
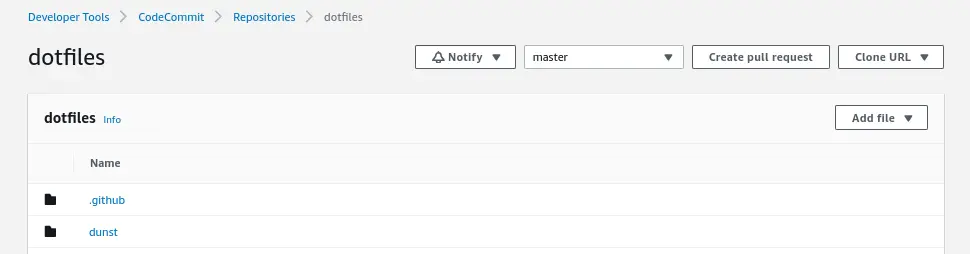
And voilà! We can now see the repository on the CodeCommit console:
Yes, I did try pushing to git@git-codecommit.us-west-2.amazonaws.com at
first. Cut me some slack, I’m learning things the hard way instead of following
a tutorial, course, or reading through pages of documentation before doing
anything.
Opening a pull request
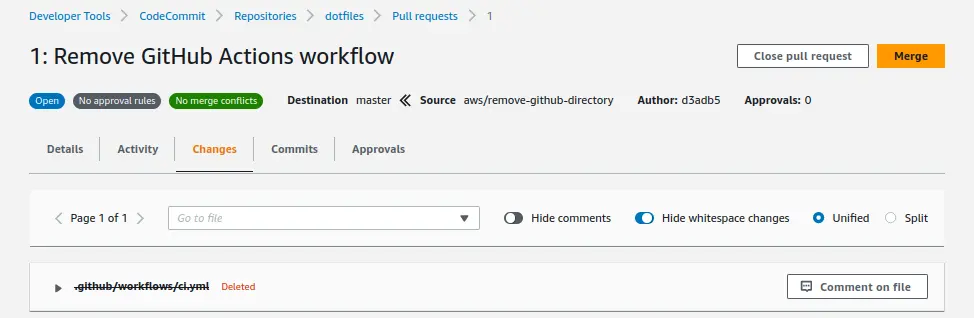
Since the “new” repository is supposed to be AWS exclusive, our first pull request will be to remote the GitHub Actions workflow. First, we create a new branch for our changes and push the branch to CodeCommit after committing them:
git switch -c aws/remove-github-directory
git rm -r .github
git commit
git push aws
I was hoping to at least get a nifty URL to open a pull request after pushing my branch, but sadly CodeCommit didn’t do even that much. GitHub and GitLab do that without need for any extra bits and bobs, so I was a bit disappointed.
Opening a pull request is straightforward, if you want to click around in the CodeCommit console, but if like me you’d rather use the command line, it’s possible to do it through the AWS CLI. It won’t infer any information from the repository you’re in, like the GitHub and GitLab official CLI tools do, so you’ll need to provide it with, at the very least, a title, the repository name, and the source and base branches:
aws codecommit create-pull-request \
  --title "Remove GitHub Actions workflow" \
  --targets repositoryName=dotfiles,sourceReference=aws/remove-github-directory,destinationReference=master
The above command assumes you have configured the AWS CLI to use the IAM user
you set up for CodeCommit, and to use the AWS region where you’re hosting your
repository. A complete version of the command would use the --region flag,
and perhaps --profile to refer to the appropriate credentials.
This is what I got to appear in the console after issuing the AWS CLI command:
Creating a CI pipeline
This is the actual challenge. With GitHub Actions, GitLab CI/CD, and Bitbucket Pipelines, all you have to do is commit the right files with the right names and they’ll automatically be picked up by the suite and sent to a queue for consumption by build agents. In fact, let’s review the only job in our current GitHub Actions workflow:
name: XMonad
runs-on: ubuntu-latest
steps:
  - uses: actions/checkout@v3
  - uses: haskell/actions/setup@v2
    with:
      enable-stack: true
      stack-version: latest
      stack-no-global: true
  - uses: actions/cache@v3
    with:
      path: ~/.stack
      key: stack-global-${{ hashFiles('xmonad/stack.yaml') }}
      restore-keys: stack-global-
  - uses: actions/cache@v3
    with:
      path: xmonad/.stack-work
      key: stack-work-${{ hashFiles('xmonad/stack.yaml') }}-${{ hashFiles('**/*.hs') }}
      restore-keys: stack-work-
  - run: sudo apt-get install -y libx11-dev libxft-dev libxinerama-dev libxrandr-dev libxss-dev
  - run: cd xmonad && stack build
I removed the names of the steps and blank lines to make the snippet shorter. What the above YAML tells us is that:
- This job will be built on a runner that is on the latest version of Ubuntu.
- We’ll checkout the repository, as per
actions/checkout, then - Setup the Haskell toolchain with the latest version of Stack, then
- Install libraries needed by XMonad’s dependencies, and finally
- Go into the XMonad directory and build the project.
Additionally, through the actions/cache action, we’re telling GitHub Actions
to:
- Before 4, try to restore cached dependencies and GHC installations.
- After 5, store the dependencies and GHC installations in the cache.
How do we reproduce the above behavior with the AWS Code* tools? More importantly, which tools do we actually need?
Using CodePipeline the wrong way
The distinction between CodePipeline and CodeBuild was not immediately clear to me. Judging by the name and a couple articles on CI/CD pipelines on AWS, I assumed CodePipeline to be a general automation pipeline product — something akin to Jenkins — and that CodeBuild would be used by CodePipeline for its build stages. While the latter may be the case sometimes, CodeBuild can be used on its own for continuous integration.
Without knowing that, I tried my hand at creating and writing a pipeline. To build the code, I needed a CodeBuild project, something that could be created automatically by AWS when creating a pipeline through the console. However, I’m provisioning every resource through Terraform, so let’s get started:
resource "aws_codepipeline" "dotfiles" {
  name     = "dotfiles-ci"
  role_arn = aws_iam_role.codepipeline.arn

  stage {
    name = "Source"
    action {
      name     = "Source"
      category = "Source"
      # ...
    }
  }

  stage {
    name = "Build"
    action {
      name     = "Build"
      category = "Build"
      # ...
    }
  }
}
The pipeline we’re defining needs only two stages: checkout the code, build the code. Unlike the arbitrary Jenkins pipeline stages we’re used to seeing, the API for CodePipeline stipulates actions must have an ActionTypeId specifying parameters that’ll be used to enforce some constraints on it. This might become clearer as we continue our checkout action:
action {
  name     = "Source"
  category = "Source"
  provider = "CodeCommit"
  owner    = "AWS"
  version  = "1"

  configuration = {
    RepositoryName = aws_codecommit_repository.dotfiles.repository_name
    BranchName     = "master"
  }
}
Looks good enough, right? Maybe we’ll be able to specify what branch we
actually want when we start a pipeline build. It’s not currently possible,
which is why picking CodePipeline was a mistake. Anyway, let’s move onto the
build action. It can be defined as such, and we can commit a buildspec.yml
file later:
action {
  name     = "Build"
  category = "Build"
  provider = "CodeBuild"
  owner    = "AWS"
  version  = "1"

  configuration = {
    ProjectName = aws_codebuild_project.dotfiles.name
  }
}
We need a CodeBuild project, as you can see in the snippet above. Creating it
is luckily trivial, but we’ll cover it later, when speaking about the actual
solution. The only things that change from what you’ll see in later sections
are that the string "CODEPIPELINE" is used for both the source and
artifacts types in the project declaration.
Handling permissions is sadly not the last thing you need in this declaration, because I left out a couple arguments in the action blocks above. Turns out the category isn’t enough to tell AWS you want your source code present in later pipeline stages: you have to declare input and output artifacts for your actions:
action {
  name     = "Source"
  category = "Source"
  # ...
  output_artifacts = ["source_output"]
}

action {
  name     = "Build"
  category = "Build"
  # ...
  input_artifacts = ["source_output"]
}
This notion of input and output artifacts is generalized, however, and doesn’t
just apply to carrying over files from one stage to another. Consequently, you
need a place to store these artifacts, as CodePipeline will not do so for
you. We are forced to declare an artifact_store block, and currently
CodePipeline supports only S3.
I can’t be bothered writing all of the boilerplate that accompanies a well declared S3 bucket through Terraform, so I’ll be using a third party module despite what I said in the beginning as the boilerplate would have nothing to do with CodePipeline:
module "artifacts_bucket" {
  source  = "terraform-aws-modules/s3-bucket/aws"
  version = "3.8.2"

  bucket = "codepipeline-dotfiles-ci-artifacts"
  acl    = "private"

  block_public_acls       = true
  block_public_policy     = true
  ignore_public_acls      = true
  restrict_public_buckets = true
}
And then we can add the artifact_store block to our pipeline declaration:
artifact_store {
  location = module.artifacts_bucket.s3_bucket_id
  type     = "S3"
}
It was only when trying to trigger the pipeline when opening or updating pull requests that I found out you can’t select the branch you’re going to build on through CodePipeline. Then I actually tried out CodeBuild and realized that is the tool to use for continuous integration.
Using CodeBuild by itself instead
So CodePipeline was a no-go. Instead we shall use CodeBuild by itself, since its API makes it possible to override not just the Git reference it’s going to fetch from the repository, but also specify environment variables! There are two things we need to get started: a project and a build specification. The latter is housed in the repository and will be written later.
To explain CodeBuild briefly: it provisions the infrastructure necessary to
follow the instructions on a build specification. The build specification can
come from a buildspec.yml file in the root of the source code that is
downloaded when you start a build through this service. In essence, it is just
like a GitHub Actions workflow in that it outlines the commands to run on a
build environment.
As already stated, you can create the project through the console and have a jolly good time. However, the hard way is always more fun, so here’s the Terraform code I used to create my project, after giving up on CodePipeline:
resource "aws_codebuild_project" "dotfiles" {
  name         = "dotfiles"
  service_role = aws_iam_role.codebuild.arn

  source {
    type     = "CODECOMMIT"
    location = aws_codecommit_repository.dotfiles.clone_url_http
  }

  environment {
    type         = "LINUX_CONTAINER"
    compute_type = "BUILD_GENERAL1_SMALL"
    image        = "aws/codebuild/standard:7.0"
  }

  logs_config {
    cloudwatch_logs {
      group_name  = "/aws/codebuild/dotfiles"
      stream_name = "dotfiles"
    }
  }

  artifacts {
    type = "NO_ARTIFACTS"
  }
}
Yes, it is that simple. To create the project, that is, notice that in the
above code we’re referring to a certain aws_iam_role.codebuild resource, and
yet I haven’t shown you the code that creates it nor the policies that it
needs! Let’s first analyze the above configuration:
- The project is named
dotfilesand interfaces AWS through a given IAM role. - The source code is retrieved from our repository on AWS CodeCommit.
- The build will be run on a Linux container with a small amount of compute power.
- The container will use image
aws/codebuild/standard:7.0, based on Ubuntu. - Logs are to be written to CloudWatch Logs, in the given group and stream.
- There are no artifacts to be produced by this build.
This section of the AWS provider documentation for Terraform will give you much more detail than I can provide here.
One thing to point out here is that the compute resources of the container where the build will take place are defined on the CodeBuild side and not on the build specification. This means there will be things outside our repository that affect our build, which is something to keep in mind when aiming for reproducibility and GitOps.
Writing a buildspec.yml
There is room for improvement here, including using a Docker image that already contains the Haskell toolchain and maybe even the dependencies we need, but I’ll leave that for another time. This is currently a proof of concept, so cost optimization can wait.
This is the buildspec.yml I wrote to reproduce what is being done today with
GitHub Actions:
version: 0.2

phases:
  install:
    commands:
      - apt-get update -y
      - apt-get install -y libx11-dev libxft-dev libxinerama-dev libxrandr-dev libxss-dev
      - curl -sSL https://get.haskellstack.org/ | sh
  pre_build:
    commands:
      - cd xmonad
      - stack build --only-dependencies
  build:
    commands:
      - stack build
Adding this to staging, committing it and pushing it to the branch created earlier in this article doesn’t really result in automatic builds, I’m afraid. Note the seemingly arbitrary names for the phases in this file. They’re actually part of the syntax.
With this file present in the aws/remove-github-directory branch, starting a
build on that branch leads is a success:
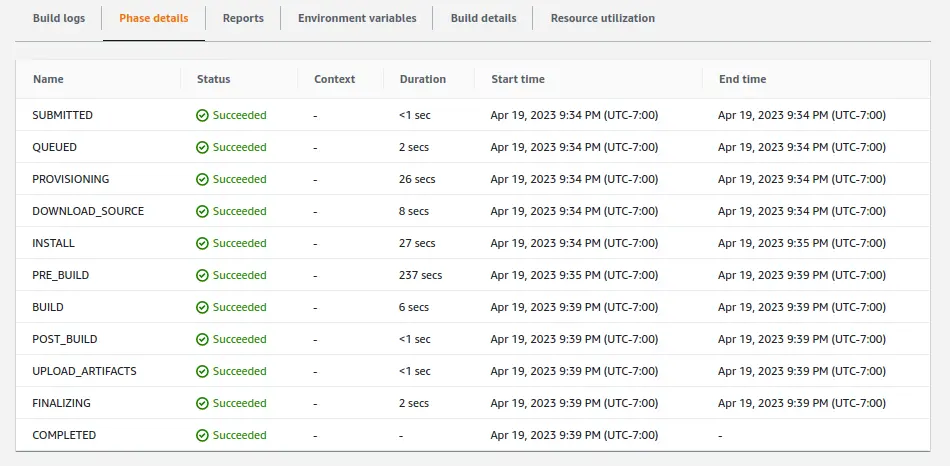
Since we got a successful build out of this branch, we’ll merge it just so the build spec file is present on the master branch.
Triggering builds for every pull request
With AWS nothing is really that simple. At least not if you’re avoiding using the console for everything you do, otherwise known as ClickOps. To get the CI pipeline to run on every pull request, we need to watch for specific CodeCommit events through EventBridge and trigger a CodeBuild build when they’re captured.
We want the rule to be triggered when a pull request is created
(pullRequestCreated) and when the source branch (head) of a pull request is
updated (pullRequestSourceBranchUpdated). Thus, the rule can be defined as
follows:
resource "aws_cloudwatch_event_rule" "pull_requests" {
  name        = "dotfiles-pull-requests"
  description = "Triggered when a pull request is created or updated."

  event_pattern = jsonencode({
    detail-type = ["CodeCommit Pull Request State Change"]
    resources   = [aws_codecommit_repository.dotfiles.arn]
    detail = {
      event = ["pullRequestCreated", "pullRequestSourceBranchUpdated"]
    }
  })
}
The CodeBuild project will be our target, and we’ll need to transform input so that the right commit is built, otherwise CodeBuild defaults to building the latest version and we’ll be awarding passing or failing marks to the wrong PRs. This is how the target is defined:
resource "aws_cloudwatch_event_target" "codebuild" {
  rule     = aws_cloudwatch_event_rule.pull_requests.name
  arn      = aws_codebuild_project.dotfiles.arn
  role_arn = aws_iam_role.eventbridge_codebuild.arn

  input_transformer {
    input_paths    = { sourceCommit = "$.detail.sourceCommit" }
    input_template = <<-ENDOFINPUT
      {
        "sourceVersion": "<sourceCommit>"
      }
    ENDOFINPUT
  }
}
The indented heredoc above is used instead of jsonencode() because the
latter escapes the angle brackets we use to refer to the sourceCommit input
key — resulting in CodeBuild trying to fetch a ref called
<sourceCommit>. Speaking from experience.
From the aws_iam_role.eventbridge_codebuild.arn reference, you can gather
that yet another role has to be created. This one’s fortunately pretty simple
and needs only the codebuild:StartBuild permission for the project created
a few steps ago.
With the rule and target created, I made a new branch making a minor change to the XMonad configuration and created a pull request, which led to a build happening automatically! A subsequent push confirmed that changes made to the PR also triggered new builds.
Getting approvals from CodeBuild
Now there’s a repository and a pipeline. The pipeline runs whenever a pull request is created or updated, but as it stands pull requests can still be merged if the pipeline fails! After all, there is no inherent semantic connection between CodeBuild and pull requests on CodeCommit. On top of that, approvals on CodeCommit are also done in an unusual way. Let me explain.
On CodeCommit, approval rules can be added to pull requests individually. That’s right, you can create an approval rule for a pull request by informing the number of approvals necessary and the pools of AWS identities that can grant those approvals. You can’t create a rule for the repository! At least not directly: you create an approval rule template for CodeCommit and associate it with your repository.
I want all of the pull requests on my repository to get a successful build as a
requirement for merging, so I’ll create a rule template and associate it with
the dotfiles repository. This rule template will require a single approval,
will be called build-approval, and will accept approvals from any identity
that assumes the role CodeBuild is using:
resource "aws_codecommit_approval_rule_template" "ci" {
  name        = "build-approval"
  description = "Approvals comings from CodeBuild."

  content = jsonencode({
    Version               = "2018-11-08"
    DestinationReferences = ["refs/heads/master"]
    Statements = [{
      Type                    = "Approvers"
      NumberOfApprovalsNeeded = 1
      ApprovalPoolMembers = [
        "${replace(aws_iam_role.codebuild.arn, "role", "assumed-role")}/*"
      ]
    }]
  })
}

resource "aws_codecommit_approval_rule_template_association" "ci" {
  repository_name             = aws_codecommit_repository.dotfiles.id
  approval_rule_template_name = aws_codecommit_approval_rule_template.ci.name
}
Finally, we need an approval from CodeBuild when it reaches success, right? Like I said, there are no inherent semantic correlations between CodeBuild and CodeCommit. The services are independent of one another, and no integrations are put in place to make it easier to use them together. From triggering builds to preventing broken merges, the user is basically told to figure it out by themselves.
The AWS CLI is preinstalled in the Ubuntu image I picked for my CodeBuild project, so after reading the API reference, I thought issuing the approval could be done with a command like:
$ aws codecommit update-pull-request-approval-state \
    --pull-request-id $PULL_REQUEST_ID \
    --revision-id $REVISION_ID \
    --approval-state APPROVE
And then I’d just need the to pass those two environment variables from the CodeCommit event by updating the input transformer block in the EventBridge target declaration like so:
input_transformer {
  input_paths = {
    sourceCommit  = "$.detail.sourceCommit"
    pullRequestId = "$.detail.pullRequestId"
    revisionId    = "$.detail.revisionId"
  }

  input_template = <<-ENDOFINPUT
    {
      "sourceVersion": "<sourceCommit>",
      "environmentVariablesOverride": [
        { "name": "PULL_REQUEST_ID", "value": "<pullRequestId>" },
        { "name": "REVISION_ID",     "value": "<revisionId>" }
      ]
    }
  ENDOFINPUT
}
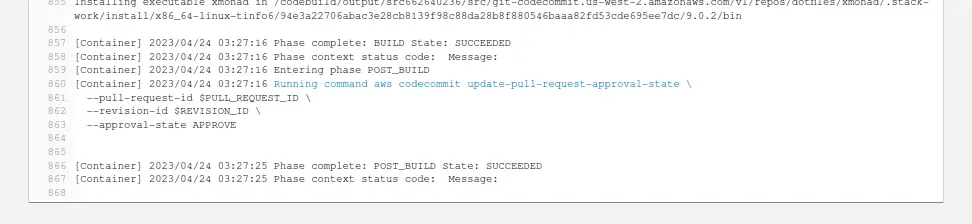
Placing that command in the build specification in the post_build phase
would just lead to an approval being issued every single time, because
according to documentation, the post-build phase is executed regardless of the
build’s success or failure. Yet another amendment was
made necessary. This time, to the build specification:
build:
commands:
  - stack build
on-failure: ABORT  # This should suffice!
After making sure the CodeBuild role was allowed to update pull request approval states, I opened a pull request from a trivial non-breaking change and hoped for a successful build and a neat approval on my pull request. The builds logs indicated everything had gone as expected, with a successful post-build phase:
And then, on my pull request, I got an approval, it just didn’t match the rule put in place:
Why? Because the approving user wasn’t in the AWS identity pool I defined in my template. I found out by getting the list of approvals through the AWS CLI:
$ aws codecommit get-pull-request-approval-states \
    --pull-request-id 3 --revision-id the-revision-found-on-codebuild

{
    "approvals": [
        {
            "userArn": "arn:aws:sts::...:assumed-role/CodeBuildDotfilesRole/...",
            "approvalState": "APPROVE"
        }
    ]
}
The Terraform state showed that the approval rule template pool members were
identified via arn:aws:iam:... and thus used an IAM prefix instead of an
STS one. I updated the template declaration and thought maybe that would fix
everything automatically:
ApprovalPoolMembers = [
  "${replace(replace(aws_iam_role.codebuild.arn, "role", "assumed-role"), "iam", "sts")}/*"
]
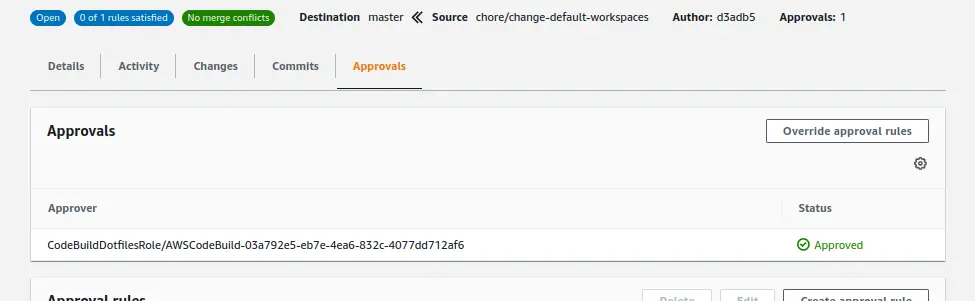
It’s really ugly, but it should work. Except it didn’t update the approval rule! Turns out the rule template is evaluated only when the pull request is created and then never again. So I just created a new pull request and waited for another build to find out that the experiment was a success:

Now what? It was at this point, with only one item left on the list, that I decided to give up on this altogether.
Why I don’t recommend using these
The reason I gave up on finishing this proof of concept has less to do with the shortcomings of these AWS services and more to do with the fact I don’t feel a pressure to use them in the market currently. They’re tools that are currently clunky, flawed and immature, and though that may very well describe some tools used daily in the industry, I don’t see why these would be.
To startups, established companies, and individuals, these services will most likely provide you less value than you will find elsewhere. Here’s a table comparing just a few aspects of AWS’ developer tools with their competition to showcase why:
| AWS | GitHub | GitLab | |
|---|---|---|---|
| Unified place for all your groups & repositories | ❌ | ✅ | ✅ |
| Dedicated CLI for everyday Git operations | ❌ | ✅ | ✅ |
| Ability to use self-hosted runners for builds | ❌ | ✅ | ✅ |
| CI and CD are defined in the same place or format | ❌ | ✅ | ✅ |
| Manages runner permissions automatically | ❌ | ✅ | ✅ |
| CI/CD builds can be set up exclusively through Git | ❌ | ✅ | ✅ |
| Failed CI builds prevent PRs from being merged | DIY | 3 clicks | ✅ |
| Reports build status to the pull request page | DIY | ✅ | ✅ |
| CI builds can be used to merge the PR automatically | DIY | ✅ | ✅ |
Believe me, this is not meant as an insult to AWS. There’s opportunity to accommodate plenty of intricate, complicated, unique workflows, especially if you’re already using AWS for the infrastructure that supports your applications — I mean, you wouldn’t be using these if all your workloads were elsewhere anyway — but I just can’t get over how much configuration is necessary just to trigger a build upon opening a pull request.
Note that you don’t have to use all of AWS’ offerings together: you can host your repository on GitHub or GitLab while using CodeBuild for your CI builds, or even use other developer tools not covered here, like CodeDeploy. In fact, my criticism here is mainly target at CodeCommit, CodeBuild and CodePipeline.
Some closing words
It took me 2 weeks to finish writing this article. That’s not because messing with AWS or Terraform is difficult, I just got busy and every time I remembered I’d have to go back to writing boilerplate, I kept putting it off. Hopefully what I wrote here was useful or entertaining to you. I hope to try CodeDeploy soon, and maybe I’ll write about it too.
And hey, if you’re one of the AWS engineers who worked on these tools, please don’t take my criticism personally. I’m sure you’re proud of what you’ve built, and you should be! Take my words as those of a customer who wishes to see some missing features. I don’t know why you would be reading my blog, but if you are, do you guys have open positions? Just kidding. Unless…