Implementing the Blue/Green deployment strategy with Helm
Use the right tool for the job, don’t follow in my footsteps
DISCLAIMER: Heed the warning in this article’s subtitle. Use the right tool for the job, this is just for fun. Well, it wasn’t just for fun in the beginning, but now that I did it and found a better alternative that fits my use case, it became just for fun.
For better or for worse, one of the principal tools for any developer or operator using Kubernetes is Helm. It’s a powerful tool for sure, but it uses Go templates, which doesn’t have the most intuitive syntax. On top of that, there are some weird decisions made by the developers of the tool — semantic versioning is a requirement for chart versions, for instance.
I’ve been working with Helm charts for a while now. A recent project I started to work on a few months ago pushed me to familiarize myself with its more advanced features, and as a result I even started a repository where I sought to implement a complete Brainf*ck interpreter as a Helm chart. Check my GitHub repositories if you’re interested.
The same project had an item on the backlog that consisted of implementing the Blue/Green deployment strategy for one of the customer’s applications. Initially I thought of using Argo Rollouts, however the lack of support for managing multiple Service’s — and my inability to add it in time, being a Go newbie — made it a non-starter. “Can I do this with pure Helm?” I asked myself. Surprisingly, the answer was yes.
A working version of these solutions — not 1:1 with what you see here, but
with the same usage — is available on my helm-playground
repository, on GitHub. The implementations are named bluegreen-simple and
bluegreen-generic.
You can use the table of contents on the right to skip to the parts that interest you.
Defining the Blue/Green strategy
Blue/Green (blue green, bluegreen, etc.) is a deployment strategy that consists of having concurrently running production and staging instances of a given service. The production instance serves real users, while the staging instance is reserved for testing up until the operator decides to flip the switch, making staging production and production a thing of the past.
Perhaps some illustrations will make more sense:
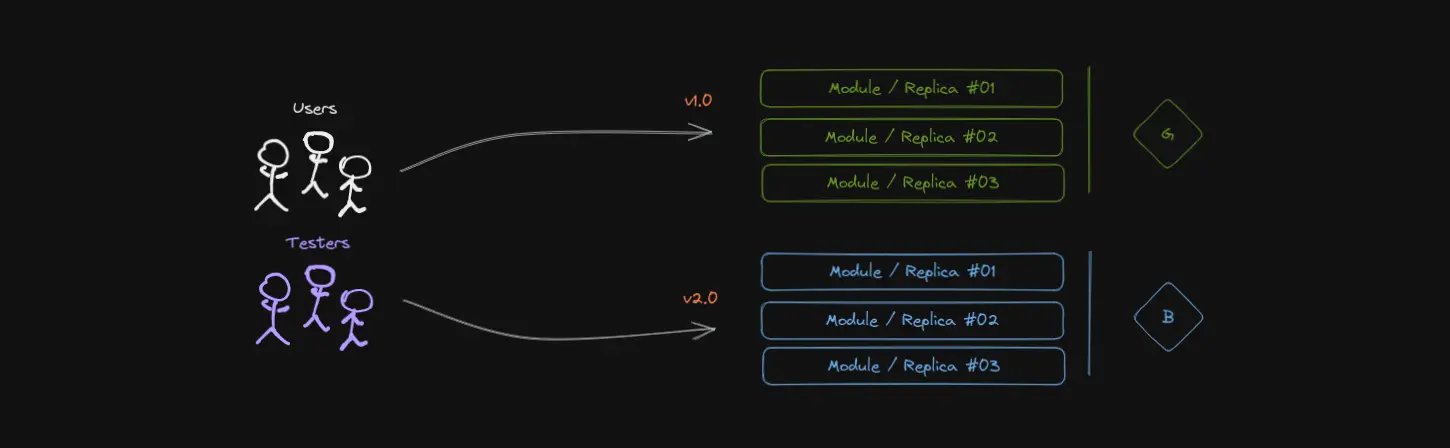
Users are served by green (v1.0), testers test blue (v2.0).
In the figure above, version 1.0 of the service — green in this case — is the one serving users. Meanwhile, some testers, be it bots or actual people, are performing some tests to see if version 2.0 of the application, running in the staging environment — blue in this case — is working as expected and thus ready to be promoted to production.
Assuming everything’s well with the application, with the flip of a switch the testers start redirecting users to version 2.0, promoting blue to production. Meanwhile, green can receive some new version as it has now become staging. Let’s say that tests now begin for version 3.0 of the application:
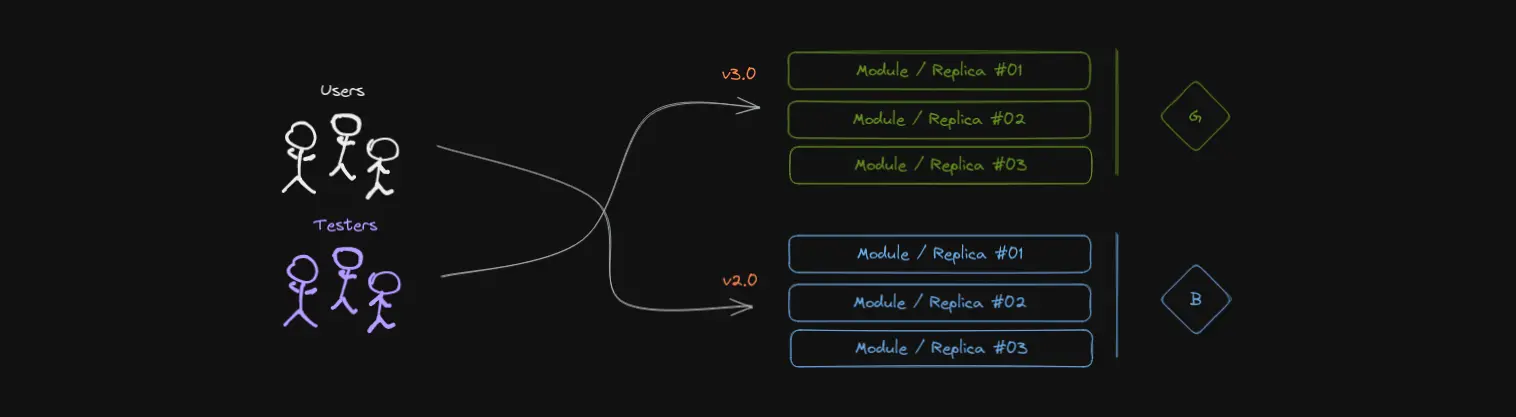
Users are served by blue (v2.0), testers test green (v3.0).
One might ask how different this is from just having a fixed staging environment and a production environment that can be updated with, say, a rolling update. Here are some advantages that may or may not apply on a case by case basis:
Staging and production environments are running under pretty much the same conditions, so the results of tests are more likely to be accurate. This is very important, as minor differences in the network configuration or a database can lead to catastrophic results.
There is virtually zero downtime. The old production environment is still running and responding to the requests that reached it before the flip of the switch. The new production environment is — or should be — ready to receive requests by the time the switch is flipped.
Rollback is trivial. If something unforeseen in the testing phase happens, the switch can be flipped back to the old production environment, and the new one can be discarded. It’s good to have a policy in place for this, though, as the old production environment might be in a bad state or have developers ready to use it as staging.
Your mileage may vary, but I personally think if the applications are ready for such a deployment strategy, it’s a good one to use.
Helm charts and limitations
So what is Helm, then? It’s mostly a templating tool with release management thrown on top of it to aid you in controlling your deployments to Kubernetes. Huh? Let me try to make it a little easier on you.
Kubernetes deployments are nothing but a collection of Kubernetes primitives / resources. These resources have a definition that can be written in YAML, a markup language. Any application that runs on Kubernetes is a collection of said resources, and usually we version the YAML definitions with Git. It looks somewhat like this:
apiVersion: apps/v1              # Don't mind this.
kind: Deployment                 # This is a Deployment.
metadata:
  name: my-beautiful-app         # It's called my-beautiful-app.
  namespace: hopkins-consulting  # It's in the hopkins-consulting namespace.
spec:
  # ...
And what if we want to deploy many of these on a single cluster, with a bunch of different names and in a bunch of different namespaces? It would sure be nice to have a templating tool so we can just edit some fields at will, right? That’s what Helm is for.
It doesn’t look pretty, but it does what we want:
apiVersion: apps/v1
kind: Deployment
metadata:
  name: {{ include "app.fullname" . }}  # This uses a partial template.
  namespace: .Release.Namespace         # This is implied, we can omit it.
  labels:
    misc: {{ .Values.labels.misc }}     # This is a value from values.yaml.
spec:
  # ...
We can tweak these values at will through the command line or through YAML files that are usually called “value overrides”.
In case you’re wondering why they’re called charts, it may be because helm is what we call the steering wheel of a ship. The ship in this case is the Kubernetes cluster, and to navigate it we use a chart. Also, doesn’t the Kubernetes logo look like a helm itself?
Partial templates or pseudo-functions?
Helm is Turing-complete. Okay, that’s a very bold claim to make. Brainf*ck is a Turing complete esoteric language, and it is very much possible to implement an interpreter using purely Helm templates. With one caveat: due to PR #7558, Helm limits recursive calls to partial templates to 1000 calls. Due to the way that limit is implemented, one can circumvent it through multiple partial templates in a closed recursive loop, but I digress.
Luckily for us one doesn’t have to squint too hard to see how that may be the case. It’s possible to emulate functions through Helm’s partial templates. So much so that throughout this article I’ll be referring to them as pseudo-functions.
What are partial templates, you ask? They’re defined using define:
{{- define "partial-template" -}}
This is a partial template. This text appears literally when you 'include' it.
{{- end -}}
They wouldn’t be useful without their “argument”, which we can call scope,
context, or top value. It is the thing you use as the last argument of
include (I will not cover the template function here):
{{- include "partial-template" "this string is the scope" -}}
And you may refer to it in the partial template as ., as you can see here:
{{- define "partial-template" -}}
I was given: {{ . }}
{{- end -}}
This scope can be many things, including a map, a list, a string, or a number.
Usually we pass around the top scope of the entire chart, which is a map
containing things like .Values and .Release.
There are some examples and more explanation in my helm-playground repository’s README.
An example chart to start with
Brace yourself, there’ll be plenty of YAML here.
Let’s conceive a simple application that runs the argoproj/rollouts-demo
image, which exposes a webpage with pretty looking lights, the color of which
is determined by the image tag. No, we’re not going to demo Argo
Rollouts, but it’s a perfect image to demonstrate deployment
strategies in action.
We’ll need a Deployment to bring up Pods, a Service to expose the application, and an Ingress to route traffic to the Service.
Let’s start the boilerplate galore with our Deployment. We’ll use the following as a base to work on moving forward:
# app/templates/deployment.yaml
apiVersion: apps/v1
kind: Deployment
metadata:
  name: {{ include "app.fullname" . }}
  labels:
    {{- include "app.labels" . | nindent 4 }}
spec:
  selector:
    matchLabels:
      {{- include "app.selectorLabels" . | nindent 6 }}
  template:
    metadata:
      labels:
        {{- include "app.selectorLabels" . | nindent 8 }}
   spec:
     containers:
       - name: christmas-lights
         image: "argoproj/rollouts-demo:{{ .Values.color }}"
         ports:
           - name: http
             containerPort: 8080
Assume partial templates like app.fullname and app.labels are defined in a
_helpers.tpl file, like the one Helm generates automatically when you issue
helm create app. We’ll define color: yellow or something in our chart’s
values.yaml file. That’ll be the default color, if none is specified in the
command line upon installation of our chart to a K8s cluster.
Now, let’s add a Service to expose the application:
# app/templates/service.yaml
apiVersion: v1
kind: Service
metadata:
  name: {{ include "app.fullname" . }}
  labels:
    {{- include "app.labels" . | nindent 4 }}
spec:
  selector:
    {{- include "app.selectorLabels" . | nindent 4 }}
  ports:
    - port: 80
      targetPort: http
And finally, an Ingress to route traffic to the Service:
# app/templates/ingress.yaml
apiVersion: networking.k8s.io/v1
kind: Ingress
metadata:
  name: {{ include "app.fullname" . }}
  labels:
    {{- include "app.labels" . | nindent 4 }}
spec:
  rules:
    - host: {{ .Values.ingress.host }}
      http:
        paths:
          - path: /
            pathType: Prefix
            backend:
              service:
                name: {{ include "app.fullname" . }}
                port:
                  number: 80
  tls:
    - hosts:
        - {{ .Values.ingress.host }}
      secretName: {{ include "app.fullname" . }}-tls
It’s admittedly a lot of YAML, but it’s not that bad. We can now install this.
Blue/Green on Kubernetes
What is Blue/Green like on Kubernetes, even? How do you implement it?! There are different ways to achieve it, but in this article we’re going to try and mimick the way it’s done by Argo Rollouts: we’ll have a label to distinguish between blue and green, and we’ll have a Deployment — Argo Rollouts manages ReplicaSet’s by itself — for each; additionally, a Service pointing to the active / production deployment and a Service pointing to the preview / staging deployment will be created.
In this case, flipping the switch means changing the active Service’s selector so it points to our new deployment. Again, probably clearer shown through illustrations:
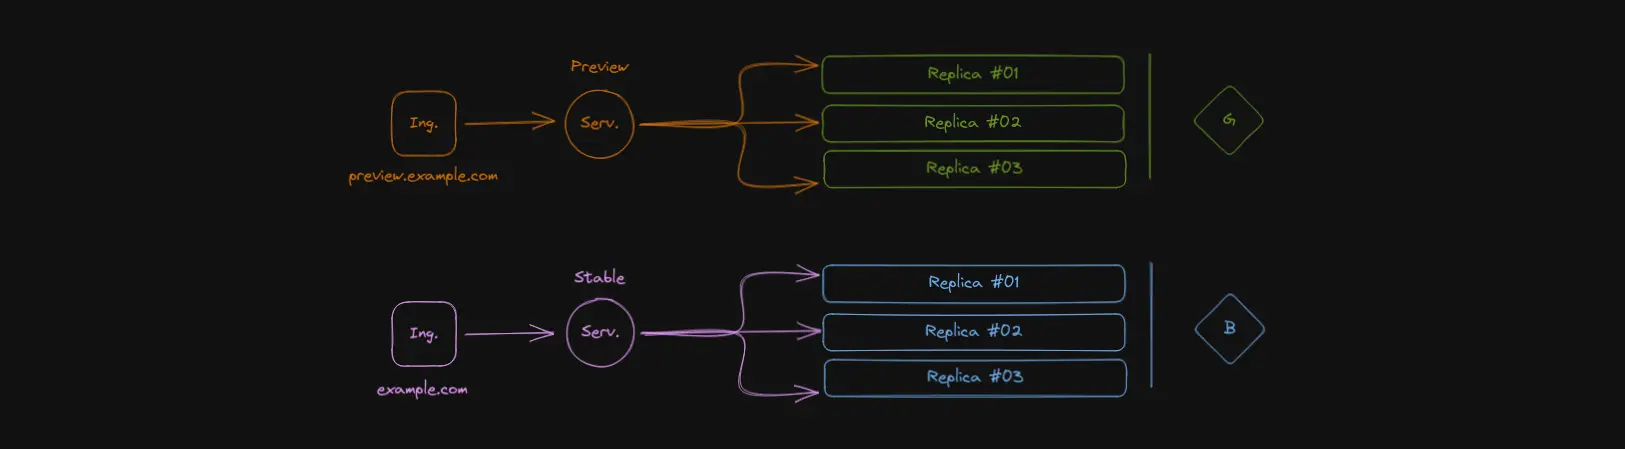
Here, green is pointed to by Preview, and blue by Stable.
Tests are performed, deployment validated, yada yada. A flip of the switch is when the selector labels for the Service’s are swapped:
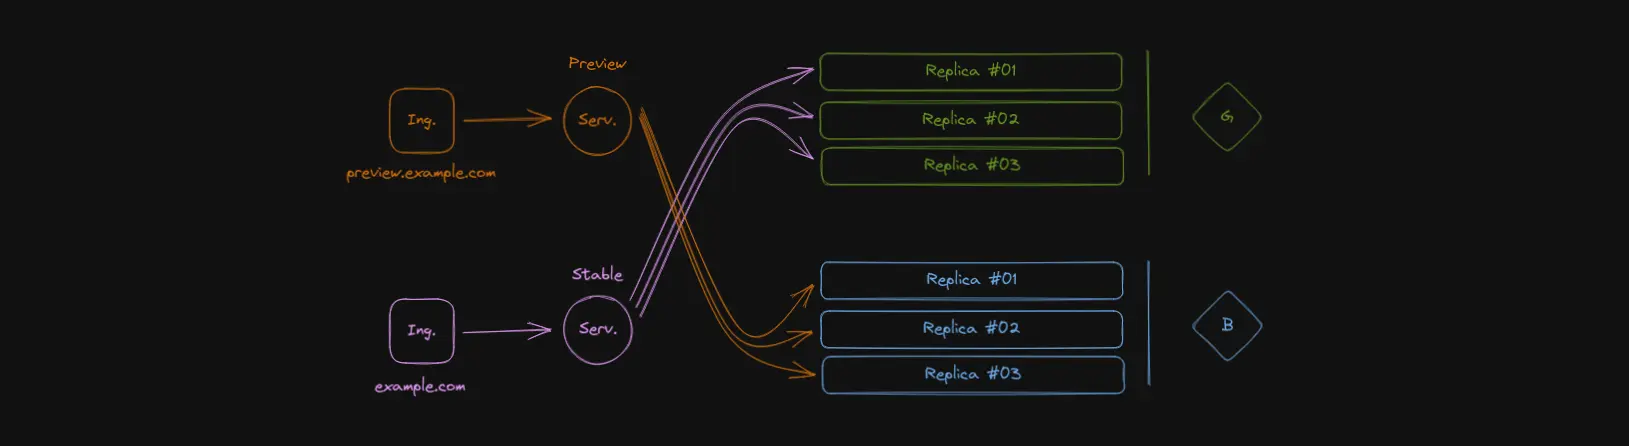
Now, green has become Stable, and blue has become Preview.
Note the color of the arrows. They represent the labels in spec.selector for
each Service. Why not just change the labels in each Deployment instead?
Because the selector labels for a Deployment cannot be changed! Later in this
article I’ll cover that more in-depth, but suffice to say it just wouldn’t
work.
Blue/Green with Helm templates
Now that we know what Blue/Green looks like on Kubernetes, or at least how we want to implement it there, we start to ask if it’s even possible to do it purely with Helm. It’s not straightforward at all: in the following command, are we upgrading the Blue deployment, the Green deployment, Stable, Preview, both? How do we promote preview / staging to stable / production?
helm upgrade -i my-app my-app -f overrides.yaml
Should we have two separate releases of the same chart? Or both environments in a single chart, always being deployed, with no concern for resource consumption? How complicated should environment promotion be? Or the implementation, even?
# Template based on .Release.Name ... ???
helm upgrade -i my-app-blue  my-app -f overrides.yaml
helm upgrade -i my-app-green my-app -f overrides.yaml

# Or something like .Values.environment?
helm upgrade -i my-app-blue  my-app -f overrides.yaml --set environment=blue
helm upgrade -i my-app-green my-app -f overrides.yaml --set environment=green
In the case of multiple releases, since Helm won’t interfere with resources not controlled by the same release, promotion would mean both releases have to be manipulated — one promoted, another demoted. This means increased potential downtime.
helm upgrade -i my-app-blue  my-app -f old-overrides.yaml --set youre=no-longer-stable
helm upgrade -i my-app-green my-app -f new-overrides.yaml --set youre=now-stable
A single release means we connect to Kubernetes to perform changes only once, cutting in half the network overhead of the earlier proposition. Rendering of the YAML manifests happens entirely before changes are applied to the cluster, which brings us to the next problem: how do we decide which Deployment to recreate?
How simple it is when outlined
Our chart values change as we update our application and prepare the testing
environment. The following steps summarize the helm upgrade process:
- Identify which version — Blue or Green — is currently considered stable.
- If Blue is stable, we’re updating Green. Conversely if Green is stable, we’re updating Blue.
- If we
--set promote=true, we have to update the Services’ selector labels accordingly. Keep them intact otherwise. - In the case of promotion, we can discard the old Deployment. Keep it intact otherwise.
Simple, right? Note that discarding the old stable Deployment in step 4 is specific to our use case and generally discouraged for production use. The reason for that is by discarding the old Deployment we lose the ability to perform a near instantaneous rollback.
Why it is actually complicated
Let’s review the steps outlined above. In step 1, how do we identify which
deployment is the stable one? Helm doesn’t keep track of its past revisions
locally, and even if it could, the cluster could’ve changed since the last
release upgrade. Inevitably, we have to query the Kubernetes API. Can Helm do
it? Yes, it can, with the lookup function:
{{- $serviceName   := include "app.fullname" . | printf "%s-stable" -}}
{{- $stableService := lookup "v1" "Service" .Release.Namespace $serviceName -}}
After the line above, $stableService will be either empty — nil — or
it’ll be a dict containing the state of the object in the cluster. If we’re
using a bluegreen label to identify the target Deployment, we can get it this
way:
# Should be either "blue" or "green"!
{{- if $stableService -}}
    {{- $currentStable := $stableService.spec.selector.bluegreen -}}
{{- else -}}
    {{- /* Assume "blue" is stable if no Service exists. */ -}}
    {{- $currentStable := "blue" -}}
{{- end -}}
Simple enough, but incredibly verbose, especially with Go template’s {{}}
wrappers.
That’s step 1 done. Step 2 is trivial:
{{- define "bluegreen.flip" -}}
  {{- if eq . "blue" -}} green
  {{- else           -}} blue
  {{- end -}}
{{- end -}}
The above pseudo-function can be invoked as follows:
{{- $currentDeployment := include "bluegreen.flip" $currentStable -}}
What about step 3? Assuming the Service is a stable resource, all we have to do is implement the logic behind each Service’s selector labels. For the stable Service:
selector:
  {{- if .Values.promote }}
  bluegreen: {{ include "bluegreen.flip" $currentStable }}
  {{- else }}
  bluegreen: {{ $currentStable }}
  {{- end }}
Meanwhile, the preview Service will always point to the current deployment, since in our example we don’t care for the old stable Deployment anymore. If that is what you want, you can just do the opposite of what is done above, for the newest stable environment. For our purposes, the following suffices:
selector:
  bluegreen: {{ $currentDeployment }}
Step 4 is a little more complicated. The reason for that is we must ensure
the stable Deployment isn’t altered in any way, lest the service go offline
or its version is modified for whatever reason. To accomplish that, we’ll use
the lookup function again:
{{- $deploymentName := printf "%s-%s" (include "app.fullname" .) $currentStable -}}
{{- $stableDeployment := lookup "apps/v1" "Deployment" .Release.Namespace $deploymentName -}}
#...
# After the Deployment templating, we tackle on the current stable one.
{{- if not .Values.promote | and $stableDeployment }}
---
{{ toYaml $stableDeployment }}
{{- end }}
And voilà! Combining all these snippets into our Helm chart means we have just implemented Blue/Green deployment purely through Helm. Well, purely through features available through Helm. There is a last step, which is adding on another Ingress object that points to the preview Service at all times. That is trivial, though:
---
apiVersion: networking.k8s.io/v1beta1
kind: Ingress
# ... Insert the rules and all that here.
# ... Remember to use a different host name!
          - backend:
              service:
                name: {{ include "app.fullname" . }}-preview
                port:
                  number: 80
How do we use this?
By default, every deployment is a preview deployment. Our first installation will create stable services and, if you configured it in your Helm chart, a stable Ingress resource as well. They’ll be pointing to a nonexistent Deployment, however, until you promote the current installation.
The first installation will create everything but a stable Deployment. Rather,
it’ll create a green one and have the ???-preview Service point to it. The
Helm command is the same as for a usual installation:
# Our overrides.yaml points to 'company/app:1.0.0'.
helm install app ./app -f overrides.yaml
Once the application is up and we’re satisfied with our tests, let’s promote the installation. This shouldn’t create or terminate any Pods, just flip the selector labels around in the Service resources:
# Assuming we didn't change overrides.yaml, of course!
helm upgrade app ./app -f overrides.yaml --set promote=true
Now that that is serving users, we start work on the newest version of our application. Of course we’ll need to test it out, so let’s deploy it to the cluster, alongside production. Watch as the stable Deployment is left intact and a new one is created:
# We changed overrides.yaml to use image 'company/app:2.0.0'.
helm upgrade app ./app -f overrides.yaml
A few months have passed, we tested everything we wanted and we’re satisfied
with company/app:2.0.0. Time to flip the switch and make it the new stable
version, so it starts serving our users. This time, if you’re following the
example configuration closely, the old stable Deployment will be deleted, and
its Pods will begin terminating:
# Again, leave overrides.yaml unchanged since the last upgrade.
helm upgrade app ./app -f overrides.yaml --set promote=true
Note that Kubernetes will send a SIGTERM signal to the Pods and wait for a
few (configurable) seconds to SIGKILL the containers. Make sure the
production version of the app is able to gracefully shut down. You can always
choose to keep the old Deployment in case of promotion until you want to
overwrite it with a new upgrade.
The Hard Part: generalizing the templates
It’s fairly possible a bunch of templating goes into creating your K8s resources, and you don’t want to repeat all of that for, say, the Ingress object. It’s also probable you have a Helm chart for an application and only now you’re considering using Blue/Green as a deployment strategy. It was my case, and I can imagine it’ll be many others'.
Fret not, with a lot of convoluted Go template / Helm template magic, we can even add toggles to make a chart support both the standard deployment process and this version of Blue/Green. It’s… unmaintainable unless you have plenty of developers that are very comfortable with Helm. Consider doing something else.
I’ll divide these steps into sections so it’s easier to comprehend.
Utility pseudo-functions (templates)
We’ll get these out of the way first. You’ve seen these snippets before, they’re just here for the sake of having everything in one place.They make a few assumptions, such as the desired name for a Service or Deployment, originally.
# Get the currently stable "color".
{{- define "bluegreen.stable" -}}
  {{- $serviceName   := include "lib.fullname" . | printf "%s-stable" -}}
  {{- $stableService := lookup "v1" "Service" .Release.Namespace $serviceName -}}
  {{- if $stableService -}}
    {{- $stableService.spec.selector.bluegreen -}}
  {{- else -}}
    blue
  {{- end -}}
{{- end -}}

# This will always be the opposite of the stable "color".
{{- define "bluegreen.current" -}}
  {{- if eq (include "bluegreen.stable" .) "blue" -}} green
  {{- else -}} blue
  {{- end -}}
{{- end -}}
Converting a generated Deployment
For starters, make your original Deployment template into a partial template, which you could even move to a library chart. With a partial template, we can easily grab the rendered Deployment object as text.
{{- define "app.deployment" -}}
apiVersion: apps/v1
kind: Deployment
# ... Insert the rest of the Deployment here.
{{- end -}}
From this rendered object, we must be able to generate a “current” Deployment. We need to override a few of its keys. Let’s start by making a partial template that contains these changes:
{{- define "bluegreen.deployment.override.preview" -}}
metadata:
  name: {{ include "app.fullname" . }}-{{ include "bluegreen.current" . }}
spec:
  selector:
    matchLabels:
      bluegreen: {{ include "bluegreen.current" . }}
  template:
    metadata:
      labels:
        bluegreen: {{ include "bluegreen.current" . }}
{{- end -}}
With this we’ll be able to change the name of the Deployment and add a label to its selector labels and its Pod template. This strimlined manifest will be superimposed over the originally rendered one. It’s important that this is understood, because it’ll be a recurring pattern from here on out.
Let’s overwrite the values, then. Given a rendered Deployment object in
$deployment and an original scope in $scope, the following snippet should
work:
{{- $overrides := include "bluegreen.deployment.override.preview" $scope | fromYaml -}}
{{- $deployment = mergeOverwrite $deployment $overrides -}}
Remember, though, we want to keep the stable Deployment around. Yet another partial template joins the collection:
{{- define "bluegreen.deployments" -}}
  {{- $scope      := index . 0 -}}
  {{- $deployment := index . 1 | fromYaml -}}
  {{- $overrides  := include "bluegreen.deployment.override.preview" $scope | fromYaml -}}

  {{- $stableName   := printf "%s-%s" $deployment.metadata.name (include "bluegreen.stable" $scope) -}}
  {{- $stableDeploy := lookup "apps/v1" "Deployment" $scope.Release.Namespace $stableName -}}

  {{- $deployment = mergeOverwrite $deployment $overrides -}}

  {{- toYaml $deployment -}}

  {{- if not $scope.Values.promote | and $stableDeploy }}
---
{{ toYaml $stableDeploy }}
  {{- end }}
{{- end -}}
Eliminate the first condition in that last if statement if you want to keep old stable even in the case of promotion.
If you were able to comprehend all of that, you should be able to generalize it
further by creating a pseudo-function that receives a rendered Deployment and
adapts it instead of generating it in-function. It just boils down to
parameterizing our override template, "bluegreen.deployment.override".
In the end, an application that uses Blue/Green for its Deployment will have the following template:
# app/templates/deployment.yaml
{{- $deployment := include "app.deployment" . -}}
{{ include "bluegreen.deployments" (list . $deployment) }}
Creating preview versions of each Service
The process is more or less the same, but this time we need to create overrides for the stable and for the preview Service objects.
The stable Service should point to the current Deployment in the case of promotion, but otherwise should remain pointing to the currently stable one. That is really all we would have to change:
{{- define "bluegreen.service.override.stable" -}}
spec:
  selector:
    {{- if .Values.promote }}
    bluegreen: {{ include "bluegreen.current" . }}
    {{- else }}
    bluegreen: {{ include "bluegreen.stable" . }}
    {{- end }}
{{- end -}}
For the preview version of a Service, we’ll need to make changes that depend on
the original one, so its override needs it as a parameter. Let’s feed it a list
with the original scope and the original Service as a dict:
{{- define "bluegreen.service.override.preview" -}}
  {{- $scope   := index . 0 -}}
  {{- $service := index . 1 -}}
metadata:
  name: {{ $service.metadata.name }}-preview
spec:
  selector:
    bluegreen: {{ include "bluegreen.current" $scope }}
{{- end -}}
So how are we going to use these to produce the pairs of stable and preview
Service resources? We’ll have to implement a pseudo-function that takes a list
containing the original scope (. from where it is being included) and all the
rendered Service manifests we want to create stable-preview pairs for.
This pseudo-function could receive a dictionary to emulate named arguments,
similar to Python’s **keyargs. It could also take the manifests parsed into a
dictionary, for easier use with the Go template structure, but that’s just
moving the invocation of fromYaml around. Anyway, this is how I decided to
write it:
{{- define "bluegreen.services" -}}
  {{- $scope    := index . 0 -}}
  {{- $services := rest . -}}

  {{- range $services }}
    {{- $serviceDict     := fromYaml . -}}
    {{- $stableOverride  := include "bluegreen.service.override.stable"  $scope -}}
    {{- $previewOverride := include "bluegreen.service.override.preview" (list $scope $serviceDict) -}}

    {{- $stableService  := mergeOverwrite (deepCopy $serviceDict) (fromYaml $stableOverride) -}}
    {{- $previewService := mergeOverwrite (deepCopy $serviceDict) (fromYaml $previewOverride) -}}

{{- toYaml $stableService }}
---
{{- toYaml $previewService }}
---
  {{- end }}
{{- end -}}
Hopefully that was easy to understand. If you’re wondering why deepCopy is
being called in the above snippet, it is because merge and mergeOverwrite
make shallow copies of the dictionaries given to it, meaning references would
remain the same in the destination dictionary. That means we’d end up with two
equal Services if we were to not call deepCopy.
The NodePort caveat
Services of type NodePort take over ports from within a range on all worker nodes. As such, they compete with each other for the same ports and there can’t be multiple Service resources with type NodePort requesting the same host port. My suggestion, if you have a NodePort that needs a specific port number, is to add 1 to the port for the preview Service.
How would that look? Ugly, I tell you. You’d add the following to the preview overrides:
spec:
  ports:
    {{- range $service.spec.ports }}
    - {{- if .nodePort }}
      nodePort: {{ add1 .nodePort }}
      {{- end }}
      {{- omit "nodePort" . | toYaml | nindent 6 }}
    {{- end }}
The omit function there is used to replicate the ServicePort object entirely
without the nodePort field.
Creating preview versions of each Ingress
This one should be a little more straightforward. For each Ingress resource that we would normally create, we’ll need an accompanying preview version of it. We’ll apply the same logic we did for Services. I know, it’s getting tiresome.
So what do we need to change? Name, host, and backend. For simplicity, this
example will just prepend the original host with “preview”, so if it was
associated to example.com before, it’ll become preview.example.com. More
ugly templates:
{{- define "bluegreen.ingress.override.preview" -}}
  {{- $scope    := index . 0 -}}
  {{- $ingress  := index . 1 -}}
metadata:
  name: {{ $ingress.metadata.name }}-preview
spec:
  rules:
    {{- range $ingress.spec.rules }}
    - host: preview.{{ .host }}
      http:
        paths:
          {{- range .http.paths }}
          - backend:
              service:
                name: {{ .backend.service.name }}-preview
                port: {{ .backend.service.port }}
            {{- omit "backend" . | toYaml | nindent 12 }}
          {{- end }}
    {{- end }}
{{- end -}}
And so we use this to create a preview Ingress for each Ingress our next pseudo-function receives. The logic is pretty much the same as for Services, though this time we don’t need to adapt the original Ingress, just add a preview one:
{{- define "bluegreen.ingresses" -}}
  {{- $scope     := index . 0 -}}
  {{- $ingresses := rest . -}}

  {{- range $ingresses }}
    {{- $ingressDict     := fromYaml . -}}
    {{- $previewOverride := include "bluegreen.ingress.override.preview" (list $scope $ingressDict) -}}
    {{- $previewIngress  := mergeOverwrite (deepCopy $ingressDict) (fromYaml $previewOverride) -}}

{{- toYaml $ingressDict }}
---
{{- toYaml $previewIngress }}
---
  {{- end }}
{{- end -}}
That… is it. We’re done. Unless you have more you want to add previews for. It’s finally over!
Conclusion
Don’t do it this way. If you’re going to implement Blue/Green using Helm, write the chart from scratch, or carefully analyze what it is you can keep without having to go overboard with templating magic like you’ve seen in this article. It’s not too complicated, but it’s not friendly. It’s hard to maintain. Helm wasn’t meant to be used as some sort of esoteric programming language. Just because you can, it doesn’t mean you should.
Argo Rollouts, please add support for multiple Services already.